Friday, December 16, 2011
Good ol Herb
Well, the Christmas party came and went and Herbert the Pervert was not a success... We got the castings made and poured the dragonskin, however we made a few mistakes, long story short, it looked a little janky, but would still do the part. unfortunately the skin glue just wasn't strong enough the hold on the heavy pieces to his face (I am thinking we may have poured it too thick...) and we were trying to get it to hold all the way up to the performance. we got pissed that the glue screwed us so we trashed the pours. We'll probably end up pouring new ones though so that James can try the costume out at Halloween!
Thursday, December 8, 2011
Yeah, Put It On Baby!!!
Started the night off molding some clay to remake Herbert the Perverts nose. My son wanted to play with "that playdough stuff" so he helped out.
 It wasnt until James and I started molding the chin and nose that we realized they look oddly like....
 well, you get the picture. We got the rubber poured in the box to make the mold, and hopefully we will be able to get the castings out ASAP so that we can get this costume on the move!
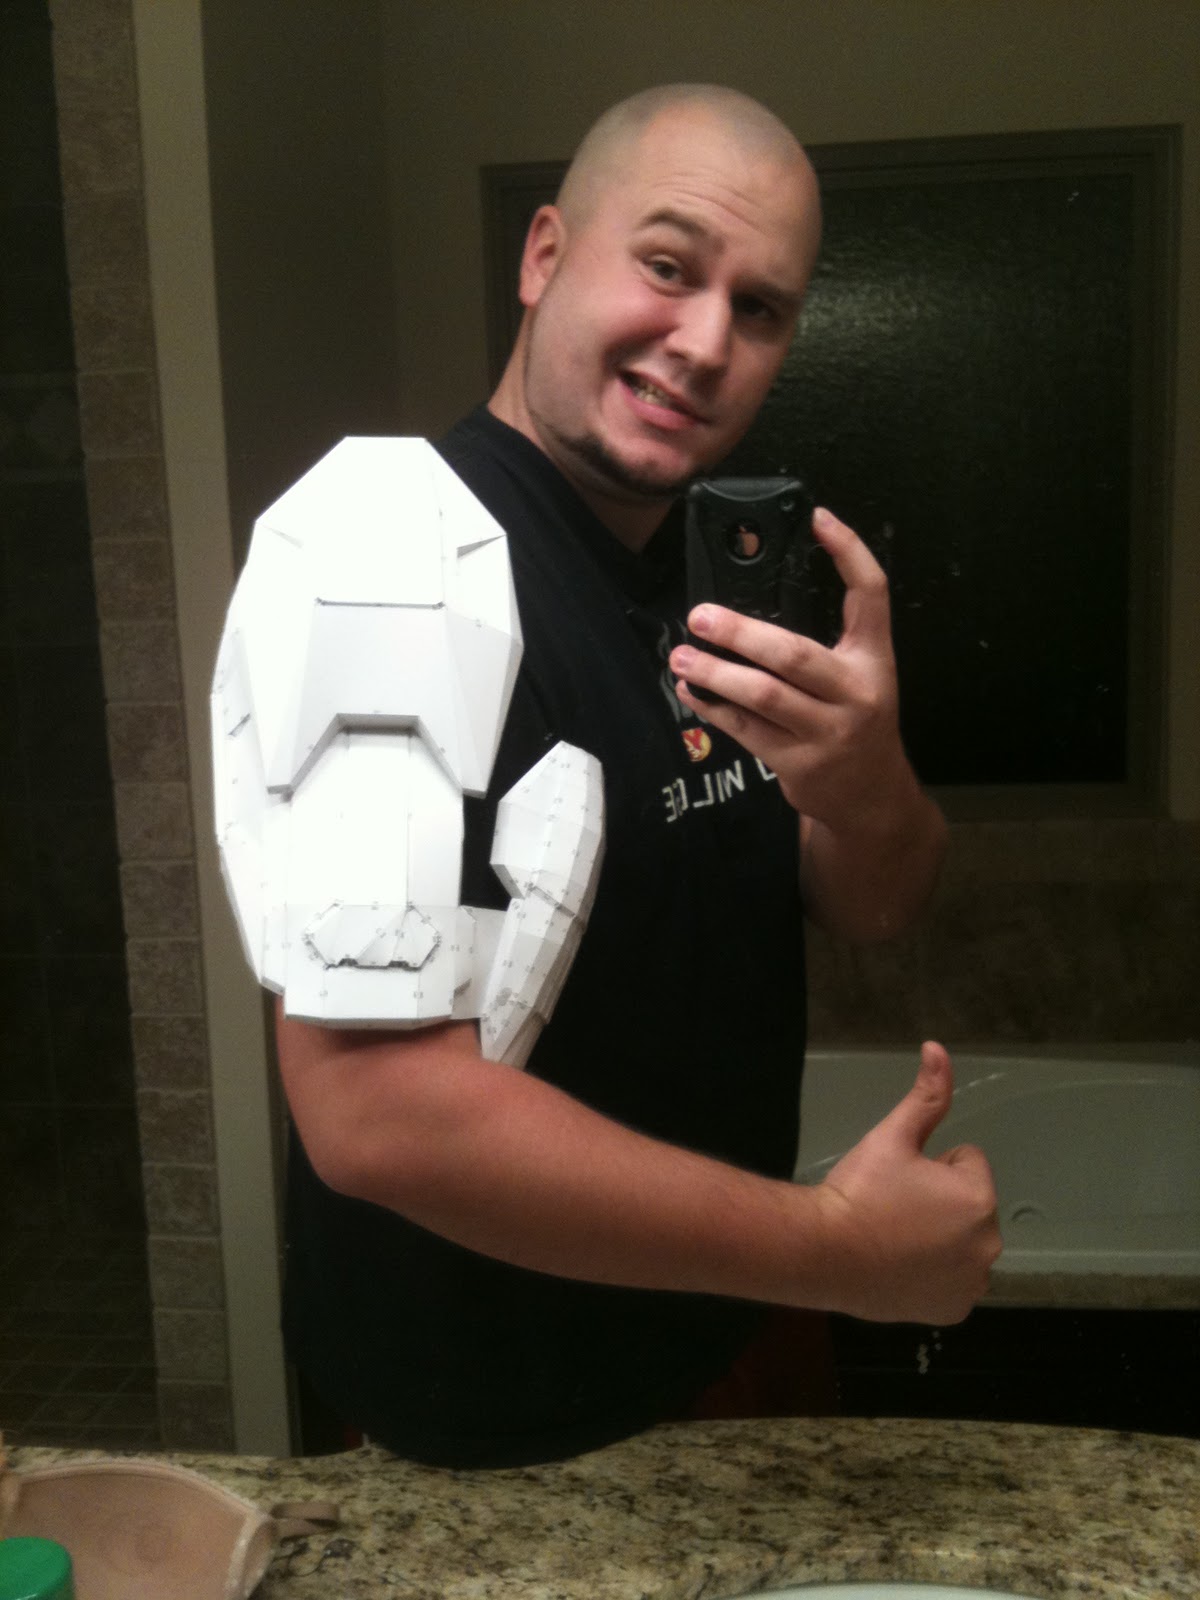
In other exciting costume news, I got to the point that I could actually try on a bit of my costume today. Since James was over, I had him take some shots of me with a few of the pieces on that I knew I could get easily on and off. I was really excited to be able to put the stuff on, now I just need to keep pressing on and get to my final result! But here are a few shots to show off how things are going.


 Yeah, I am making the same face in just about every photo...
Still in the same phase on some of the other pieces as I have been, but progress is being made!


In other exciting costume news, I got to the point that I could actually try on a bit of my costume today. Since James was over, I had him take some shots of me with a few of the pieces on that I knew I could get easily on and off. I was really excited to be able to put the stuff on, now I just need to keep pressing on and get to my final result! But here are a few shots to show off how things are going.


Still in the same phase on some of the other pieces as I have been, but progress is being made!
AAAHHHH
Okay, so it has obviously been forever since I have been able to post anything, and unfortunately I dont have a lot of improvements. I do have some more pieces of the suit fiberglassed and ready to be sanded, but there is still a ways to go. hopefully I can work on it some more tonight and get my left side (arms and legs finished out with the fiberglass. Once I get to that point I'll put it on and take a picture, hopefully tomorrow)
I have been stocking up on some fun toys (tools) to help aid me in all the processes of making this thins. nothing too extravagant, but some of it is pretty cool.
On a side note, my buddy James has a company Christmas party on Tuesday and he has to perform in their talent show. He does an AWESOME "Herbert the Pervert" impression (the old man on Family Guy), so I have been trying to use all my knowledge I've been reading up on and make him a dragon skin face of Herbert. I am in the middle of making it... it's kinda last minute... but we'll see how it goes and I'll try to get a video or something!
Stay tuned, the best updates are coming!
Monday, November 14, 2011
I must be dying!
Well, unfortunately I haven't made any progress on the suit in a while. I have been deathly ill and am finally starting to get better, so I will hopefully be able to get back out there and finish off the fiberglass work soon!
Saturday, October 29, 2011
*Deep Inhale* "Ahhh... Good 'ol H2O!"
Well, I got a few things done today. I managed to make it back out to the store and blow some cash on some essentials. I figured I would buy a few more brushes, and some more resin. I picked up the quart of resin and was about to walk away when i saw a few shelves over they had a gallon of resin, for only twice as much as a quart!!! For those of you who aren't down with measurements thats four quarts for the price of two ;)
I also managed to find myself a respirator. I had to go to 4 different places before I found one. I went to Lowes expecting them to have one and when I couldn't find them I asked these two girls behind the counter... and they didn't even know what a respirator was... lol, they definitely were only hired because they were relatively attractive, because they were no help for anything! Anyway, I finally wound up at Tractor Supply and they had one left, so I got it and it helped a LOT. I didn't notice the fumes at all.
 Sidebar, don't drink a beer and then put on a respirator, because it will not filter out the smell of you burps and breath when it is already inside the filter!
 I decided to work on the two arm pieces tonight and finish coating the exterior of the cod piece. I tried coating the exterior of the pieces first and then doing the fiberglass work...

 Problem is, I coated it, then immediately expected it to be dry/stiff enough to put in the fiberglass, and it probably would have worked out best had I coated the outside and then waited, but I didn't because I'm impatient...
I also wanted to point out, it may be a good idea to go ahead and cut up a lot of the fiberglass before you touch anything else. that way your hands wont be sticky while handling the fiberglass and if wont be sticking to your hands the whole night driving you crazy.
 And if you don't already know, which if you don't know this you had better go read some more on fiberglassing... but fiberglass will get all over everything... So wear cloths that you don't mind getting a little messy (which you should already be doing due to the resin).
I also managed to find myself a respirator. I had to go to 4 different places before I found one. I went to Lowes expecting them to have one and when I couldn't find them I asked these two girls behind the counter... and they didn't even know what a respirator was... lol, they definitely were only hired because they were relatively attractive, because they were no help for anything! Anyway, I finally wound up at Tractor Supply and they had one left, so I got it and it helped a LOT. I didn't notice the fumes at all.


I also wanted to point out, it may be a good idea to go ahead and cut up a lot of the fiberglass before you touch anything else. that way your hands wont be sticky while handling the fiberglass and if wont be sticking to your hands the whole night driving you crazy.

Y'all Wanna Get High?
I finally got out to work on fiberglassing the suit and while I made quite a few mistakes, I think I learned a lot of useful information. Not to mention considering I have never worked with fiberglass before I think that I did a pretty kick ass job!
"*schick* Ahh, thats the stuff..."
 A shot of after my first few ounces of resin and fiberglass.
 I took off the bottom support (actually one side fell off when I picked it up because it couldn't hold the weight...) which was not good because it wasn't sturdy enough to hold its shape, so I had to hold it for like 30 minutes to make sure it dried right.

 Overall I probably about 2/5-1/2 a can of resin on the inside alone, I also used up all the hardener that came with it (so my drops may have been bigger that recommended) and I still have to do the outside of it, so I am gonna have to buy a LOT more resin... but I did only use like 1/10 a bag of fiberglass but I will probably use more ;)
A few things I think I did wrong:
- I poured more resin in my container than I could use at a time and it hardened, so I had to throw it out...
- I should have waited to remove the supports until AFTER the resin and fiberglass had dried enough to hold shape, I took one of them off for easier access but I think it caused the piece to loose its shape a little.
- I didn't plan well enough for cure time while I was working on it. I would recommend doing a few pieces at a time so while one is wet and drying you can work on another piece.
-Try to keep the weight balanced, I went around from the front to the back and the weight wasn't distributed well so it couldn't stand up which made it hard to stand up on its own.
- And last but not least... I didn't use a respirator. WARNING: If you have never worked with fiberglass resin and you are like me and think "oh, they say I need a respirator but thats just for legal purposes or something, and I can get away with just something covering my mouth..." You are wrong! I am an idiot for not wearing one (pretty sure I will be buying one tomorrow) because that stuff smells STRONG! Not to mention I was working outside in the open air and I could still smell it...
"*schick* Ahh, thats the stuff..."


A few things I think I did wrong:
- I poured more resin in my container than I could use at a time and it hardened, so I had to throw it out...
- I should have waited to remove the supports until AFTER the resin and fiberglass had dried enough to hold shape, I took one of them off for easier access but I think it caused the piece to loose its shape a little.
- I didn't plan well enough for cure time while I was working on it. I would recommend doing a few pieces at a time so while one is wet and drying you can work on another piece.
-Try to keep the weight balanced, I went around from the front to the back and the weight wasn't distributed well so it couldn't stand up which made it hard to stand up on its own.
- And last but not least... I didn't use a respirator. WARNING: If you have never worked with fiberglass resin and you are like me and think "oh, they say I need a respirator but thats just for legal purposes or something, and I can get away with just something covering my mouth..." You are wrong! I am an idiot for not wearing one (pretty sure I will be buying one tomorrow) because that stuff smells STRONG! Not to mention I was working outside in the open air and I could still smell it...
Tuesday, October 18, 2011
You Live, You Learn
So I walked out into my garage today to head off to work, to find that I am an idiot. One of my pieces of armor had folded in on itself on the bottom side from the weight of itself... now you may think I am being hard on myself calling myself an idiot but, I work with paper all day every day because I print books for a living! I know better than to leave a paper object sitting around in a place subject to temperature and humidity change... Now I have to remake the waist piece.
Moral of the story, start fiberglassing or strengthening process shortly after you finish a piece of the armor and don't wait around letting them sit unsupported until you finish all of them. So more than likely I am going to have to man up and do some fiberglass work this weekend. Stay tuned!
(This could be a disaster!)
Wednesday, October 12, 2011
Details Details Details!
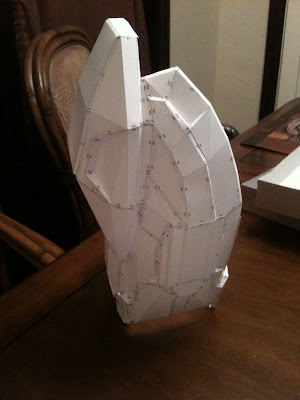
So I finally finished the left forearm piece and holy crap! There is a good amount of detail placed in that piece. Nevertheless, I finally finished it. The biggest thing I am worried about with this piece is making the mold for it. I am not sure if it will form properly with all the details if I only make it a 2 part mold, so i may have to go to a 3 piece, but I don't know for sure yet, I am still researching it. Anyway, here are the shots from tonights accomplishment!
 Obviously I had to start the night off right ;)
Lucky for me I already had about 80% of it done, so I didn't have too much left to do to finish it.


 I tried to take some extra shots that were closer up of some of the detail in it, but I don't know if the pics will do it justice since all I have is a cell phone... (Yes my wife is a photographer with a kick ass camera, and no I don't know how to use it...)

 Obviously, I have been working on this for a while now, and I am getting close to finishing the first step and it wont be long before I am on to the next step, but for now, its more cutting, scoring and folding for me!

Lucky for me I already had about 80% of it done, so I didn't have too much left to do to finish it.


Tuesday, October 4, 2011
Bi/Tri/Shoulder Piece Build
I finished my bicep piece last night around 1:30am, I am surprised I was still awake because my new workout regimen has been killer! This piece wasn't as easy as I thought it would be, there were a few areas that caused me some trouble that i will probably just have to fill with bondo later and carve out. But here are the shots i took of it:

I found it rather difficult to properly mold the oval on the back of the triceps. There are a lot of little tiny cuts and folds on the bottom side of it and while I didn't do a bad job, it just didn't turn out great.
and of course, I had to take a goofy pose shot wearing it...
 Up next, the forearm...


I found it rather difficult to properly mold the oval on the back of the triceps. There are a lot of little tiny cuts and folds on the bottom side of it and while I didn't do a bad job, it just didn't turn out great.
and of course, I had to take a goofy pose shot wearing it...
Friday, September 30, 2011
Cod & Butt Done
I got the cod piece done last night, came out really well I think... however I am DEFINITELY going to have to get back on my diet and workout program because its gonna be a tight fit. Not to mention the fact that I have put on 35lbs since this time last year when I dropped out of CrossFit... but that's another story. Here are the shots of the whole waist band:
 Back Side
 Front Side
I am starting to get pretty pumped about this project again as i near completion of the cutting, scoring and gluing phase. I cannot wait to move on to the next steps (I am pretty nervous about it though...) stay tuned!!!
next up................. the arms.


I am starting to get pretty pumped about this project again as i near completion of the cutting, scoring and gluing phase. I cannot wait to move on to the next steps (I am pretty nervous about it though...) stay tuned!!!
next up................. the arms.
Monday, September 26, 2011
FINALLY DONE.... Putting the Chest Together...
That's right, last night I FINALLY finished gluing together the final pieces of the chest armor for the suit. I have been working on this piece for a while and had some issues along the way, but a lot of things resolved themselves once I got the support struts in. All in all I think it came out pretty well, but I can tell there are a few areas I am going to have to do some work on. Word of warning to anyone who may attempt this piece, it is not at all easy. there are a LOT of little pieces and it will take some time. Also, I would HIGHLY recommend keeping your computer close by with your pep viewer open because it will save you a lot of time figuring out which piece connects to what.
Here are some shots of the finished product:


 The back is definitely the most difficult piece to work with, the center of the top and bottom have a ton of little pieces that have to squeeze in together just right which is just absolutely irritating if you don't have everything lined up just right... It helped the time go by watching some football in the background too...
Here is a shot of my table in the garage with all the pieces on it that i have done so far.
 So far I have been able to make the Helmet, Chest, L&R Thigh, L&R Shin, my EOD Shoulder, and the Hand piece. (the stuff on the right is mostly waste)
I also started work on the cod piece, I got about 60% of it cut out last night and may try to work on it some more tonight after everyone goes to bed!
Fun Fun Fun!!!
Here are some shots of the finished product:


Here is a shot of my table in the garage with all the pieces on it that i have done so far.

I also started work on the cod piece, I got about 60% of it cut out last night and may try to work on it some more tonight after everyone goes to bed!
Fun Fun Fun!!!
Monday, September 19, 2011
Cutting and Scoring...
and folding... and gluing... and binding... and cutting... and holy crap there is a lot of detail in this chest piece!!! Getting close though, pics soon to come!
Tuesday, September 13, 2011
Getting Back To It
Okay, I took a few days off just because working on this stuff every waking second when I'm not at work or with my wife and two kids just isn't realistic =P. But I did work a little more on it last night and started on my chest piece. I got a good bit done on it, but it still has a loooong way to go. Here is my progress so far:
 I made the mistake of cutting out most the pieces first, but quit when i realized I was gonna have to dig through all the loose pieces when i started building. Hopefully I can get the front finished tonight and see how the front will look. Also, I left the top open behind the neck so I could try it on once I get the front done.
On another note, I quit drinking soda yesterday. I know, its only been one day, but that was the first day in about 4 months I have gone without one... just a random thought for the day...

On another note, I quit drinking soda yesterday. I know, its only been one day, but that was the first day in about 4 months I have gone without one... just a random thought for the day...
Thursday, September 8, 2011
Pep Sizing Update
Okay, so I thought I would post my sizing info I have so far because most of the trouble I have had this far in making my suit has been wasted time on making pieces that were the wrong size. for the most part the theory of dividing your size by Master Chief works, but some of the pieces (at least the models I downloaded) have been a little off... anyway, I am 5'11 so my calculation was
71 / 86=.8255814
I am 71 inches tall, Master Chief is 86 inches tall, therefor I had to multiply the scale factor on everything by 0.82558 to get my proper fitting, so far everything fits after a little working around this number.
So here is what I have on the pieces I have made so far:
Mark VI Helmet (I have a big head so I had to make the helm slightly bigger than the average person might, but not too much bigger.)
Thighs - Left and Right
Shins - Left and Right
Hands (I made this just slightly too big, probably should have gone down to a 28 height, but they'll work.)
EOD Shoulder
71 / 86=.8255814
I am 71 inches tall, Master Chief is 86 inches tall, therefor I had to multiply the scale factor on everything by 0.82558 to get my proper fitting, so far everything fits after a little working around this number.
So here is what I have on the pieces I have made so far:
Mark VI Helmet (I have a big head so I had to make the helm slightly bigger than the average person might, but not too much bigger.)
| Height | 315 |
| Width | 275 |
| Depth | 409 |
Thighs - Left and Right
| Height | 432 | |
| Width | 254 | |
| Depth | 270 |
Shins - Left and Right
| Height | 426 |
| Width | 253 |
| Depth | 185 |
Hands (I made this just slightly too big, probably should have gone down to a 28 height, but they'll work.)
| Height | 30 |
| Width | 116 |
| Depth | 135 |
EOD Shoulder
| Height | 193 | |||||||
| Width | 268 | |||||||
| Depth | 194 |
Wednesday, September 7, 2011
More and More
Last night was a good night for working on my suit. I was able to get quite a bit of work done thanks to James coming over and helping my for a couple hours! I had all the pieces to the right thigh already cut out, but none of them were scored yet so he worked on that while I started cutting out pieces to the right shin.
 James was able to get all the pieces scored for me and once I finished cutting out the shin, I put those pieces in a box and started assembling the right thigh. It took me a while to get it finished because I somehow managed to screw up some of the pieces I glued together so they got misaligned and I had to take them apart and redo them. Eventually, I got it finished and wound up with both thigh pieces!
 I took a pic of them on, but I don't know that its "not offensive" considering all I had on was my under armor... ;) So for now we will just say, they fit.


Tuesday, September 6, 2011
Back From the Weekend
Well, had a long Labor Day weekend and now its back to work. I didn't get as much done on the suit over the weekend as I thought I would, but that's alright because I got to spend some time with my boys and my wife instead. I was planning on starting some fiberglass work last night to check it our and see how it went, but James never showed (yeah I'm calling you out buddy! =P). I did still get some work done on my right thigh piece and should have it assembled in the next day or two. I made a new resized hand piece over the weekend as well and was about half way through cutting out the second one when I realized if I am making molds why waste my time making a second identical piece...? So I quit making it. I also made my newly resized torso tester and it almost fit, but was just a tad short, so now i am trying to decide if i want to make a new tester or just upsize the final one and go for it (probably a bad idea...). Anyway, that was about all my progress thus far...
Friday, September 2, 2011
Bit by Bit
Last night one of my wife's friends came over, so I got quite a bit of work done on stuff. I assembled the EOD shoulder I am wanting to add to the suit and had to figure out how i was going to attache the backing but still be able to insert fiberglass and other reinforcing agents. I ended up taking three of the back pieces and cutting them up so they held things together but still left openings.
 (sorry for the poor quality, I take all the pics with my phone and this was in the garage so it wasn't very lit...)
Here is the finished outside look
 It actually is pretty sturdy, but I want to be sure it has plenty of reinforcement if I decide to try and make a mold out of it.
After I finished that I got to work on my new thigh piece. It isn't much shorter than my last one, but that's what I needed (kinda pisses me off how little I was off on the size... but oh well). I also cut out some pieces to remake my hand pieces, and resized my forearm pieces so that they should fit once I get them built.

Here is the finished outside look

After I finished that I got to work on my new thigh piece. It isn't much shorter than my last one, but that's what I needed (kinda pisses me off how little I was off on the size... but oh well). I also cut out some pieces to remake my hand pieces, and resized my forearm pieces so that they should fit once I get them built.
Thursday, September 1, 2011
Last Night for August
Well, last night I tried working some more on my left thigh piece in hopes of finishing it up... however I got side tracked after I cut out all the pieces and I ended up working on my EOD shoulder piece as well. I got all the pieces cut out for both things and i started gluing together the shoulder and ignoring the thigh for tonight. I was up working on it till about 3am when I realized it was freaking late and I had to get to work in the morning so it isn't quite finished, but I would say I am about 60% done with assembly so it shouldn't take more than an hour to finish it out.
I am thinking I actually might only make the outer shell because the pep file designed it to be one solid piece, but obviously 1, it will be hard to seal it up completely and 2, I have no idea how in the world I would fiberglass it if I were to leave the middle hollow... plus i am trying to think about wearability (yeah, I am making up words now) and i might attach something like a knee pad to the inside of it anyway so it has some padding to it. But we will see when we come to that point.
In other news, I found out yesterday that I am going to be able to take off this Monday for Labor Day! So I may have to do some laboring and get some hard core work done on this suit over the weekend...
Wednesday, August 31, 2011
Getting up to Date
So to bring everything up to date... over the past week I have been working on a few other pieces late at night after work and everyone else has gone to bed. I reprinted the helmet, and one thigh and shin piece to make sure I got the sizing all squared away (I was pretty sure I finally had it down but just wanted to be sure). the first piece i started to remake was the helmet. It took about 15 hours over the course of 4 nights of working on it, but eventually I got this.
 Okay, so I made the helmet, but last time I made it I couldn't fit it over my head...
 IT FIT!!! I am very excited that it worked. Obviously after having made 7 pieces that didn't fit I was really starting to get discouraged. But this really helped to lift my spirits!
After that, I got to work on the left shin piece. I wasn't sure it was going to fit after all my previous sizing failures... but it was a perfect size as well!
 Now I have two pieces that fit, only about 12 pieces to go... but, I doing good thus far and hopefully gotten a lot of my mistakes out of the way. On Monday night I started cutting out the pieces to my newly resized left thigh piece but I only got about 1/3rd of it cut out. I didn't do any work last night because getting toward the end of the month I was pretty tired from work, so I decided to take a rest day... However I should have the new left thigh finished by tomorrow night and hopefully I can snap a pic of the two leg pieces together.


After that, I got to work on the left shin piece. I wasn't sure it was going to fit after all my previous sizing failures... but it was a perfect size as well!

Getting Started
Okay, so I started my progress on the paper modeling probably about a week and a half ago. I have been following some blogs and looking up online articles about how to do everything I think I will need to know and I decided I was ready to give it a go!
First I had to figure out how I was going to print everything off because I had to turn the file into a PDF and didn’t know how to do that, but once I figured it out it was no problem!

After that, I got to work on what I thought would be the easiest piece to work on, the hands. They weren’t bad, but I soon realized many mistakes I was making. I didn’t score the crop lines as I made it so all of my folds were very rough, I used tape to put it together instead of glue which altered the layers and integrity of it (especially if I added tape externally), and I didn’t have the sizing right! So they were trash, but I got some good experience out of the way!


Eventually I was ready to move on to the chest piece.

I downloaded the low rez version to make sure I had the sizing right.


After that I decided to go ahead and start on the helmet. I always played with the EOD helm but the Mark VI is far more recognizable so the EOD will have to wait till later. unfortunately, my big fat head wouldn't fit through the hole so the helmet was too small too.
After that I decided to work on my Left Thigh piece. (I kept changing pieces because I already printed everything out... another mistake) so I got it all done and hey... IT FIT!


Well... not really. While it holds onto my leg it is actually about an inch too long (that's what she said) and I cannot bend my knee properly... so I will be remaking this piece as well.
Subscribe to:
Posts (Atom)